
THE ULTIMATE GUIDE TO CERAMIC COATING WHEELS & CALIPERS
Ceramic coating your wheels and calipers is more than just an aesthetic choice; it's an investment in the protection and longevity of these vital components. With daily driving, your wheels and brakes are exposed to a barrage of contaminants, from brake dust to road salts, which can compromise not only the look but also the integrity of these parts. Ceramic coatings offer a durable shield, repelling these abrasive substances and making cleaning a breeze.
When considering ceramic coating for your wheels and calipers, think of it as applying a second skin that's both resilient and hydrophobic. This technology has evolved rapidly, allowing you to maintain the pristine condition of your wheels for longer periods. The process involves meticulous cleaning and preparation of the surfaces, followed by the application of the coating, which bonds at a molecular level, providing a long-lasting layer of defence against the elements and regular wear and tear.
Your driving experience is enhanced not just by the performance of your vehicle, but also by its appearance and the peace of mind that comes with knowing key components are well protected. Taking the step to ceramic coat your wheels and calipers can be a smart move, sustaining the value and enjoyment of your vehicle over time.
Essentials of Ceramic Coating for Wheels and Calipers
Protecting your wheels and calipers using a ceramic coating not only enhances their appearance but also provides a durable shield against various elements. Here's how you can grasp the concept, identify the benefits, and prepare for the application process.
Understanding Ceramic Coatings
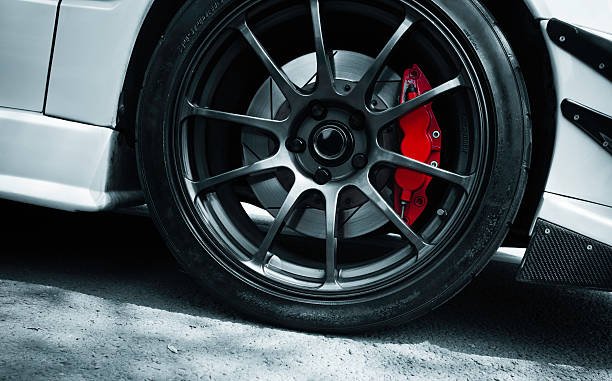
Ceramic coatings for wheels and calipers involve the application of a liquid polymer that chemically bonds with the vehicle’s factory paint to create a layer of protection. This protective layer is typically made of nano-ceramic coating materials, which offer a harder finish compared to traditional waxes and synthetic polymers. The main function of a ceramic coat is to offer a semi-permanent shield that can withstand various kinds of contaminants.
Protection qualities: Hydrophobic properties, resistance to UV rays, dirt, brake dust, and corrosion.
Durability: Once cured, the coating provides long-lasting protection for several months or even years.
Benefits of Applying Ceramic Coatings
Applying a ceramic coating to your wheels and calipers can have several advantages. One benefit is the added slickness of the surface, which significantly reduces the adhesion of contaminants like brake dust and dirt.
Hydrophobic nature: Causes water to bead up and roll off the surface, which helps to keep the wheels cleaner for longer periods.
Glossy finish: Enhances the look of your wheels and calipers, giving them a richer, deeper shine.
Ease of cleaning: Helps maintain the appearance with less effort since dirt and grime will have a harder time sticking to the surface.
Preparing Your Wheels and Calipers for Ceramic Coating
Before applying a ceramic coating, one's wheels and calipers must be meticulously cleaned and prepped. This crucial preliminary stage ensures that the coating adheres properly and lasts longer.
Deep Cleaning Process and Decontamination
A thorough deep cleaning is the first step in preparing wheels and calipers for ceramic coating. Start by removing loose dirt and debris using water from a pressure washer or hose. Following this, an iron remover should be applied to the wheels to dissolve stubborn contaminants such as brake dust which originates from the wear and tear of brake pads and is notoriously difficult to remove.
Step 1: Rinse wheels with water to remove loose debris.
Step 2: Spray iron remover liberally and let it dwell to break down brake dust and road salts.
Step 3: Use a wheel brush, preferably with soft bristles, to gently scrub the wheels and calipers.
Step 4: Apply a wheel cleaner or degreaser and agitate with a brush for tougher contaminants like tar and salt.
Step 5: Rinse thoroughly with water, ensuring all cleaning agents and dissolved contaminants are fully washed away.
A microfiber towel can be used to dry the wheel and prevent water spots, leaving a pristine surface for the next steps.
Surface Preparation Techniques
For the ceramic coating to bond effectively, a user must ensure the surfaces are completely free of any residues or oils. Decontamination plays a role here, but it is the surface preparation that is key to creating an ideal bonding environment.
Step 1: Once clean, wipe down the wheels and calipers with isopropyl alcohol (IPA) to remove any lingering oils or residues.
Step 2: Examine the surface for any imperfections; apply a light polish if necessary to ensure a completely clean surface.
During this stage, it's important not to touch the cleaned areas with bare hands as oils from the skin can interfere with the coating's adherence. Instead, use clean microfiber towels or gloves to handle the wheels and calipers throughout the process.
Applying and Caring for Ceramic Coatings on Wheels and Calipers
Applying a ceramic coat to wheels and calipers is a meticulous process that requires attention to detail, while maintenance ensures the longevity and effectiveness of the protective solution.
Step-by-step Application Guide
Clean the Wheels and Calipers: Before anything else, one should thoroughly wash the wheels and calipers using a high-quality wheel cleaning agent to remove all dirt, grime, and residues. This typically involves using a pressure washer or hose, and potentially an iron remover to tackle brake dust and road contaminants.
Decontaminate: After washing, apply a decontamination product to remove any remaining contaminants that a regular car wash might miss. This ensures the ceramic coating will bond properly to the surface.
Dry and Prep the Surface: Thoroughly dry the wheels and calipers with a microfiber towel. Inspect for any damage that needs repair since the coating will seal the current state of the surface.
Application of Ceramic Coating: Apply the ceramic coating methodically across the wheel and caliper, using a proper technique to ensure even coverage. Spray-on products or applicator pads may be used for DIY ceramic coatings like Armor Shield IX.
Curing: Allow the coating to cure for the time specified by the product manufacturer. The curing process is essential for the nano-ceramic coating to create a durable barrier.
Maintenance and Upkeep Strategies
Routine Cleaning: Regularly clean the coated wheels with a pH-neutral car shampoo and a microfiber wash mitt to maintain their glossy finish. Heavy cleaners and abrasive brushes should be avoided as they can degrade the coating's hydrophobic properties.
Inspection: Consistent inspection for any chips or signs of wear is crucial. Quick identification and action can prevent corrosion and extend the lifespan of the protective coating.
Reapplication: Depending on the product's durability and the car’s exposure to the elements, reapplication of the ceramic coat may be needed. Typically, this is necessary every few years for long-lasting protection.
Protection from Extreme Elements: Whenever possible, protect the vehicle from extreme heat or cold, which may affect the integrity of the ceramic coating over time.
Maintaining ceramic-coated wheels requires consistent care, but it rewards vehicle owners with long-lasting durability and a constantly polished look, making it a valuable investment for any car enthusiast.
VIP Auto Spa/Ceramic Pro Reno is a Ceramic Pro Elite Dealer for The Reno/Sparks regions. You can get in touch to learn more about our services here.